It involved a fair amount of research to figure out how to setup and use virt-manager, virt-viewer, and even understanding what QEMU/KVM/libvirt are and what they do. This is as much a reference for me as I hope it to be helpful for others looking to use these technologies.
Why KVM/QEMU?
Virtualbox is a virtualisation staple for GNU/Linux, and most novice users or those without particularly complex use cases gravitate toward it. They may not even know that there are other open source virtualisation technologies available.
I'm about to make the case for why you might consider using QEMU/KVM over Virtualbox on a GNU/Linux system:
- Oracle, the company that principally develops Virtualbox (previously Sun Microsystems before being acquired by Oracle), obscures several features behind its extension package, which is not freely licensed. It is not source-available. Without its extension package, you will not, for instance, be able to passthrough your USB devices to the guest.
- You have many more configuration options that can improve performance or offer exotic functionality you might be in need of. If so inclined, you could spend the time required to setup VFIO GPU passthrough, which beats the hell out of anything Virtualbox can do.
- QEMU/KVM has far fewer bugs and instances of unexpected behavior. I frequently encountered graphical glitches and keyboard input issues with Virtualbox. None of this exists on my QEMU VM.
In summary: it's more open, has more features, and it's less buggy.
And who doesn't prefer Red Hat to Oracle?
If you need 3D acceleration on Windows guests (and don't have the option of GPU passthrough) or simply can't handle the learning curve, use Virtualbox. If you have a Linux guest, virtio drivers should support OpenGL graphics acceleration. That's still a work-in-progress for Windows guests, and likely will be for some time. If you need good performance, VFIO or native is the way to go. Virtualbox's 3D accelearion will improve performance, but don't expect miracles.
QEMU is a much nicer experience for most use cases...once you learn it.
The problem is not necessarily that QEMU/KVM/virt-manager is hard, but that sparse documentation exists. And the documentation that does exist is more geared toward people who already know what they're doing.
This is intended to be a basic guide to get you up and running with QEMU, while introducing you to more complicated parts of QEMU naturally. We'll make use of the GUI when it's easier to use, and move to a terminal when it's simpler. You don't have to use virt-manager if you're allergic to GUIs; you can use virsh. It just won't guide you through the process the same way virt-manager will.
Keep in mind that if you want to do something that you think virt-manager is missing, that it is probably possible with virsh. Read through your distribution's man page for virsh to see what you can do with it. And aggressively search online, because some features might be undocumented (in typical GNU/Linux fashion).
What About GNOME Boxes?
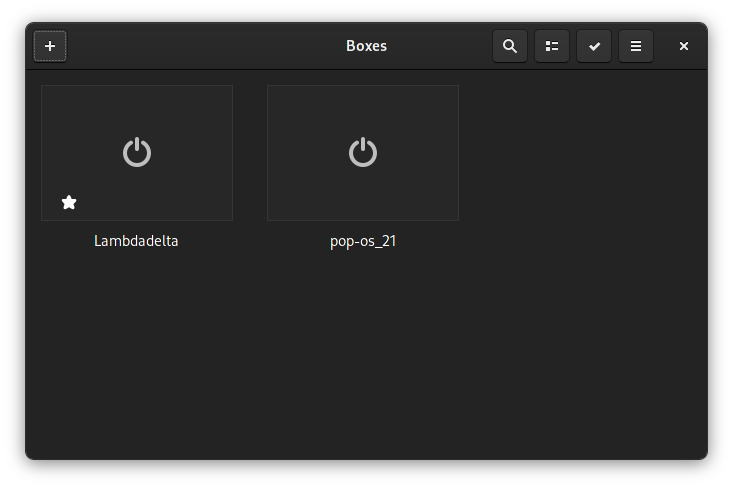
GNOME Boxes uses libvirt, QEMU and KVM, just like virt-manager. However, it's a lot simpler, without nearly as many options, so you should be able to fumble around and still do everything you want to if you only need basic VM functionality.
If you have very simple needs, GNOME Boxes is great. It does shared folders, too. However, if you want to disconnect the network on the guest, you'll need to disconnect it for the host, too, as there is no apparent way to do that inside of the GUI. If you just want something that works and is open source, use GNOME Boxes. The interface is super simple and you're ready to use the VM in seconds. The experience is still better than Virtualbox, in my opinion.
GNOME Boxes also offers a CLI interface with some interesting options. Execute gnome-boxes --help-all to see all of the available options. One of note is:
gnome-boxes NAME_OF_VM -f
This commannd opens the VM in GNOME boxes in fullscreen.
You can do the same thing with UUIDs instead:
gnome-boxes --open-uuid XXXX_XXXX_XXXX_XXXX -f
To see the UUID for a VM you've created, open GNOME-Boxes, click on the properties for the VM, and edit the XML. You should see the UUID near the top of the file.
Another option is gnome-boxes --checks, which checks if your machine is setup to use KVM/QEMU.
If you decide to use GNOME Boxes, you can still follow most of the setup steps for the Windows 10 Guest in this guide, such as installing the SPICE drivers. However, this guide will only focus on virt-manager and virt-viewer.
A Glossary
- Virtual Machine: A system that runs inside of a computer with virtual (i.e. simulated) hardware components such as a CPU, RAM, NIC, and HDD, which are abstractions of the physical hardware. Operates separately from the rest of the system.
- Hypervisor: Software, firmware, or hardware that creates and runs virtual machines by emulating hardware.
- Type 1 Hypervisor: A hypervisor that runs natively; bare-metal, running directly on the hardware. Predominantly used in place of an operating system in data center environments, but KVM makes it possible to use a Type 1 hypervisor inside GNU/Linux.
- Type 2 Hypervisor: A hypervisor that runs inside the context of an operating system as simply another application. A typical example is Virtualbox.
- Host: The machine or operating system on which the hypervisor is run.
- Guest: The machine or operating system that is being virtualised.
- Domain: A term libvirt uses to describe guest VMs.
- QEMU: Stands for "Quick Emulation". It's a Type 2 hypervisor that can partner with hypervisors like KVM, Xen, and even Virtualbox to do so.
- KVM: Stands for "Kernel Virtual Machine". This is a module built into the Linux kernel, which was created in 2006 and is now maintained by Red Hat. QEMU can act as a hypervisor by itself on the software/userland layer, but KVM allows you to take advantage of your CPU for virtualisation tasks, essentially converting QEMU into a type 1 hypervisor, offering better performance.
- libvirt: A library that exposes parts of QEMU to other applications. End users do not use this directly, but use other applications like virt-manager and virsh, which interface with QEMU through libvirt.
- libvirtd: A daemon that manages libvirt.
- virt-manager: A GUI created and maintained by Red Hat that allows users to create, run, and manage VMs.
- virt-viewer: A minimal GUI called from the terminal that has access to some features virt-manager doesn't.
- virsh: Virtualisation shell. A comprehensive shell that allows users to create and manage their virtual machines.
- SPICE: Simple Protocol for Independent Computing Environments. The primary method used for graphically connecting with and interacting with QEMU VMs.
Installation
On Arch Linux:
sudo pacman -S qemu libvirt virt-manager virt-viewer spice spice-gtk iptables-nft dnsmasq
Setup
Enable and start libvirtd, the background service that manages libvirt.
sudo systemctl enable libvirtd.service && sudo systemctl start libvirtd.service
You will need to add your user to the libvirt group so that programs you run—like virt-manager—can interface with libvirtd.
sudo gpasswd -a username libvirt libvirt-qemu
There are alternative methods of ensuring your user can authenticate with libvirtd. If you don't want to or can't add your user to the libvirt group, choose one of the alternative methods listed on ArchWiki: https://wiki.archlinux.org/title/Libvirt#Set_up_authentication
For future administration tasks, you'll also want to make sure that virsh is using the right URI for after you create your VMs (virsh uses qemu:///session by default, but virt-manager uses qemu:///system, which means that virsh will not be able to manage these VMs).
To do this, change the LIBVIRT_DEFAULT_URI environment variable:
export LIBVIRT_DEFAULT_URI="qemu:///system"
Edit your ~/.bashrc file and insert this line to force this setting to persist every time you start your host system.
You now need to reboot your computer for all these changes to take effect.
Creating a Virtual Machine
Open virt-manager, and add a new connection (File > Add New Connection). Choose QEMU/KVM. You may not need to do this if it's already there.
Create a new VM by choosing File > New Virtual Machine.
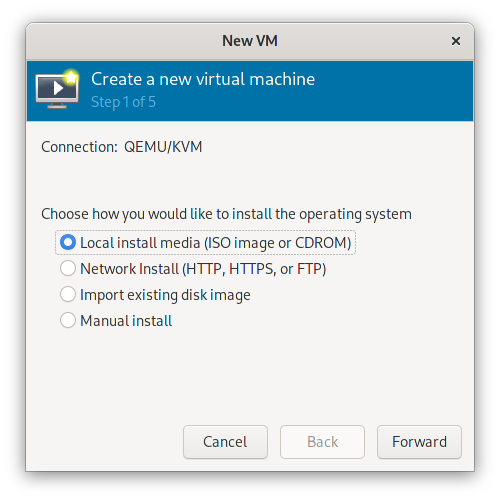
Choose your installation medium, which will typically be ISO. Click "Forward."
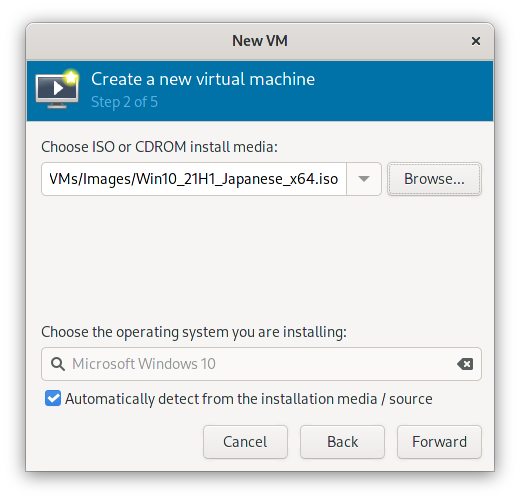
Click "Browse..." and then click "Browse Local", find your ISO file, and open it. It should automatically detect the OS type, but if not, uncheck "Automatically detect from the installation media / source" and then find it on the list. Click "Forward".
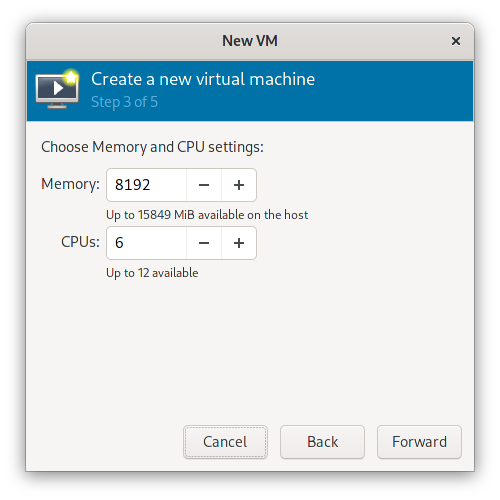
Allocate Memory and CPUs accordingly. No more than half of what is available is recommended. Click "Forward".
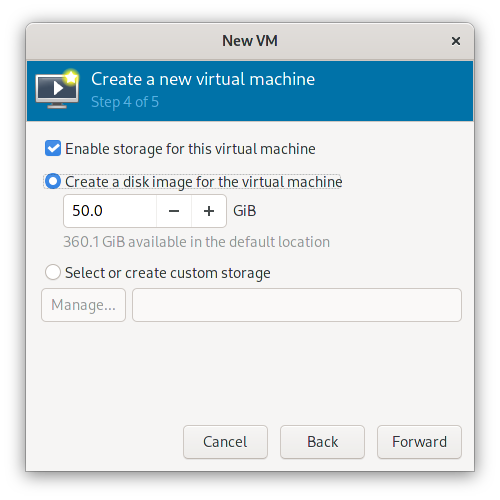
If you don't want to have your VM on a separate drive and just want all of the defaults, all you need to do is allocate the amount of disk space (50GB+ is reasonable for a Windows guest; 20GB is reasonable for a GNU/Linux guest) and click "Forward".
If you do want it on a separate drive, or want to create a raw image, select the radio button for "Select or create custom Storage".
Click "Manage...", which will open up the storage pool screen. Add a new storage pool by clicking the "+" icon in the bottom left, name it, leave dir as the default type, select a target path on your chosen drive (if you don't have a folder already, open your file manager and create it), and click "Finish".
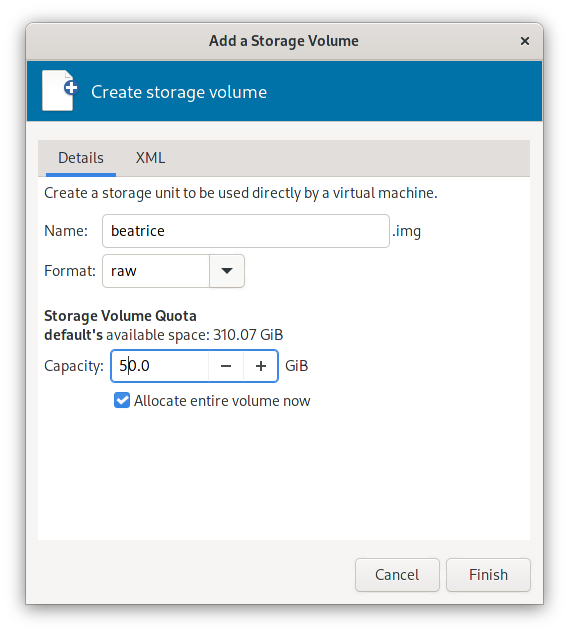
Now, add a new Volume to your Storage Pool by clicking the "+" next to "Volume". Name the volume and keep it at qcow2 if you want to take advantage of snapshots and various other features. If, however, you don't need those features and are more concerned with performance, choose raw. Depending on what you're doing, it will provide a considerable performance increase.
Make sure that you have enough capacity and click "Finish." Unchecking "Allocate entire volume now" will allow you to reclaim disk space when the VM is not running, but the VM will be slower to start up.
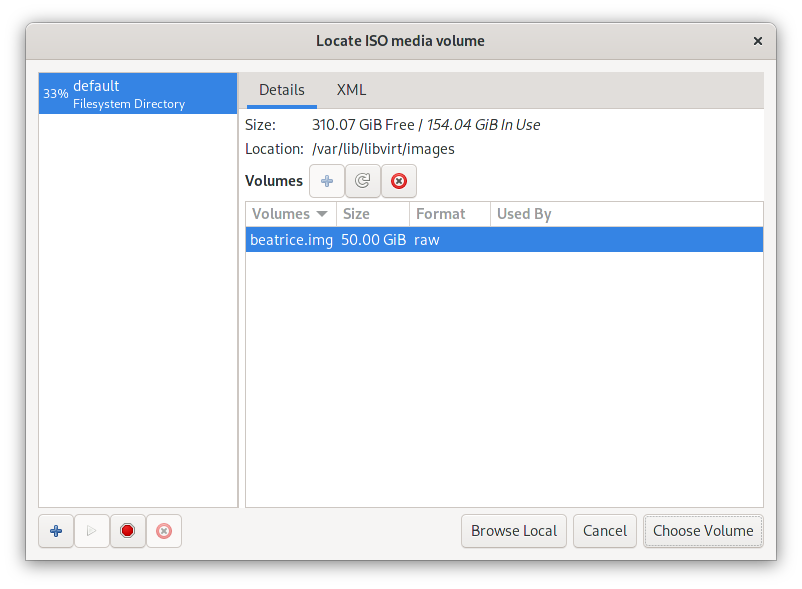
Left-click the volume and click "Choose Volume".
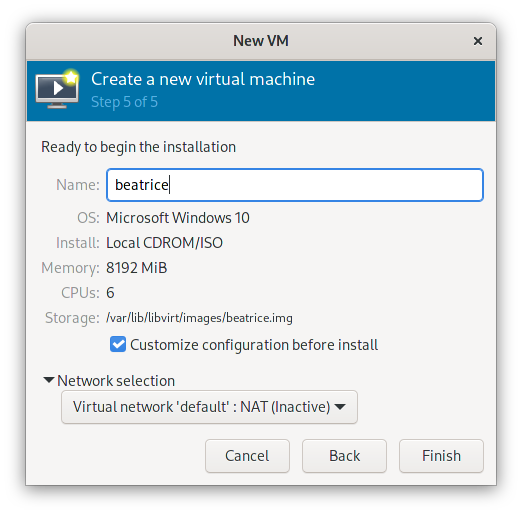
Name the VM and check "Customise configuration before install". virt-manager gets one thing wrong by default. Leave the network as default for now, but if you don't want to connect your VM to the internet, enable the virtual network and disable the network on your host machine (it's the only way) and see Disconnecting Your Guest From the Information Super Highway after installing the OS on your new Virtual Machine. Click Forward.
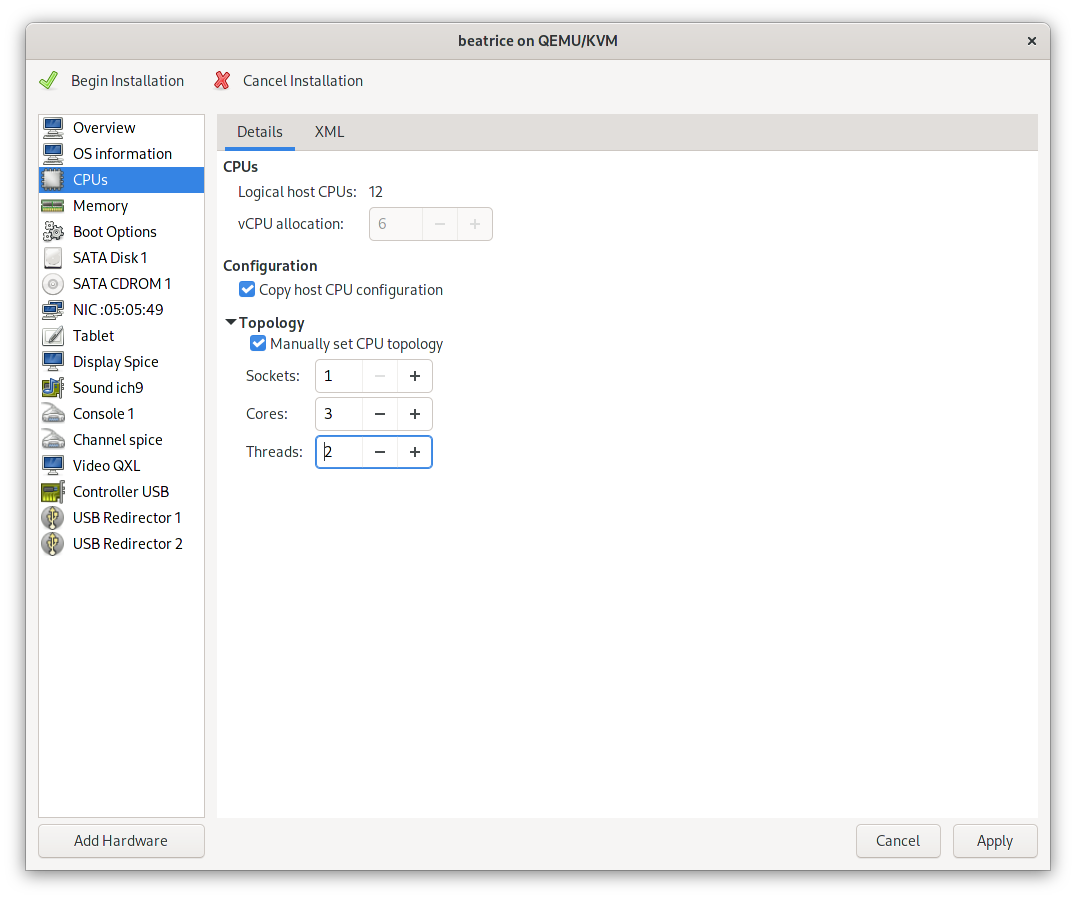
Click on "CPUs" and check "Manually set CPU topology". By default, virt-manager allocates multiple sockets, but you should reduce this to 1 socket and choose the number of cores and threads you want to allocate. The number of threads is the number of threads per core. So, 3 cores with 2 threads would mean that each of these 3 cores has 2 threads. Changing the number of sockets to 1 will improve performance on CPUs with more than 2 cores. Click "Apply", and then click "Begin Installation" in the top left of the window.
Install the operating system on the ISO for the VM. The steps will vary depending on the opereating system you have chosen.
Troubleshooting
Can't Start Default Network
Make sure that iptables-nft and dnsmasq—or whichever network packages you are using—are installed. To further diagnose the issue, open a terminal and try:
sudo virsh net-list --all
sudo virsh net-start default
Try restarting libvirtd:
sudo systemctl restart libvirtd
If all else fails, reboot your machine and try again. You may have updated significant components of your operating system, such as your kernel or systemd, which caused programs like VPNs and libvirt to be unable to network properly.
Error Starting Domain: Could not open file.img: Permission Denied
This error occurs when a program running through the libvirt-qemu user does not have permission to access the virtual machine image. One way to fix this is to run libvirtd with the same user as you.
To do this, edit /etc/libvirtd/qemu.conf and and add:
user = "youruser"
Then restart libvirtd:
sudo systemctl restart libvirtd
Working With Your Virtual Machine
Open a terminal and get your fingers ready.
Start your VM.
virsh start VM_NAME
Connect virt-viewer to the VM to start interacting wtih it.
virt-viewer VM_NAME
You can also open the session in virt-manager, but virt-manager doesn't have some of the options that virt-viewer has; namely, the option to enable/disable shared clipboard and configure shared folders.
Importing Virtual Machine Domains From Another Host Machine
Copy all the .xml files that define your VM domains from the old host machine's /etc/libvirt/qemu/ directory to the new host machine's /etc/libvirt/qemu/ directory.
Restart libvirtd:
sudo systemctl restart libvirtd
You may also need to edit the .xml files and manually change the file paths if the drive of your images or your username is different from the old host machine.
Starting a Domain and Viewing it With virt-viewer Inside a Script
Intuitively, and naively, you might think that all you need to do to start a "Domain", which is what libvirt calls guest VMs, is insert the above lines in a bash script, map it to a keyboard shortcut, and call it a day.
The reality is a little more complicated.
Fortunately, the correct way is only slightly more involved. By default, when the script runs, it will not automatically connect to the correct libvirt URI. As a result, it will not be able to find the domain to start, and virt-viewer will not be able to find the domain to view. We need to make use of virsh's and virt-viewer's options to explicitly specify the URI in our commands.
Here is a sample bash script you can use, replacing the name of the VM with your own—assuming your naming sense isn't as good as mine:
#! /bin/bash

virsh -c qemu:///system start bernkastel
virt-viewer -w -c qemu:///system bernkastel
I then made this script executable with chmod +x and mapped it to ALT+X in the keyboard shortcuts section on GNOME by inputting /home/james/scripts/name-of-script.sh in the Command field. Substitute the directory path with your own.
If you added source ~/.bashrc to the top of this script and removed the explicit connection option to the system URI in both commands, this would probably still work, because your ~/.bashrc should set the relevant environment variable. I don't think it hurts to be specific, though.
Setting Up Your Windows 10 Guest
The following steps apply to Windows 10 Guests, as they are both the guests that require the most attention, and the guests most people will find themselves wanting to virtualise on a GNU/Linux system, wanting to run Windows-exclusive proprietary software. There is not currently a section for GNU/Linux guests, but there may be in the future.
Installing SPICE/QXL For Better Performance
SPICE and QXL drivers work best with Windows guests, which is what virt-manager will setup by default. However, you will need to install some software on the guest to improve performance and add functionality.
Once the operating system is installed, open your web browser and navigate to https://spice-space.org/download. Go down to the Windows Binaries section, and install the following on the guest:
https://www.spice-space.org/download/windows/spice-guest-tools/spice-guest-tools-latest.exe
You'll also want to install the Windows SPICE agent:
https://www.spice-space.org/download/windows/vdagent/vdagent-win-0.10.0
Setting up Shared Folders
If you want to use shared folders, install the following on the guest:
https://www.spice-space.org/download/windows/spice-webdavd/
To configure shared folders, make sure you're using virt-viewer and click the top-right hamburger menu and click preferences. Check "Folder Sharing" and select the folder you want to share on your host. Close the screen and open File Explorer on the guest. Click on "This PC". You should see something similar to "Z:\\LABEL". Click on it, and save something in it. Check the folder on your host system to ensure it works.
If you don't see the drive, try rebooting the system and repeating these steps. You will need to turn on folder sharing and specify the folder every time you start up the VM and view it in virt-viewer. I have not yet figured out a way to make this persistent, but I imagine it's possible with virsh.
Disconnecting Your Guest From the Information Super Highway
This applies to any guest, not just Windows 10 guests, as these steps are performed in the virtualisation software; not the guest.
There are a few reasons you would want to disconnect your Windows 10 Guest from the Information Super HIghway:
- Windows 10 automatically downloads updates and applies them without consent. This is annoying, and completely unnecessary if you aren't doing any network-related tasks with your VM.
- Windows 10 automatically collects data about the operating system and your activity and sends it back to Microsoft. Some of this data is collected and sent back at the time you perform the action, while others are grouped together and sent in bulk. This telemetry is difficult to disable fully, and in future updates, is likely to be patched back in. If you don't want Microsoft to collect this data about you, or you simply don't want an operating system that you have no hope of fully controlling to abuse your internet connection for something that doesn't benefit you in any way (some updates can be quite large), you may want to disable internet access if it's unnecessary for the tasks you want to perform in your Windows 10 guest.
- You don't want your guest to be vulnerable to an attack from the internet.
Cutting off your guest from the internet is quite simple in QEMU. First, you need to create a virtual network that only operates between your host and your guest. This can be done in virt-manager or in virsh, but virt-manager is the easier option, so that's what we're going to use.
Open virt-manager, click "Edit > Connection Details". Click on the "Virtual Networks" tab. Add a new network by clicking the "+" icon in the bottom left. Name the network and set the mode to Isolated. Click Finish.
Next, you need to edit your VM to connect to this network instead of the default network. Click "Edit > Virtual Machine Details". Click "View > Details". Click "NIC". Change the Network source to the new virtual network you just created. If you want to disconnect from any virtual network altogether, uncheck the Link state. Click Apply.
If you boot up the VM, you should be able to verify that the connection does not allow you to connect to the internet. However, shared folders will still work.
Performance Tips: Things You Can Do to Improve Performance on a Windows 10 Guest
- Choose raw for the image type. qcow2 gives you access to snapshots and other features, but raw results in considerably less overhead. However, if you want even less overhead, consider getting an entire partition or drive, installing the OS on that, and passing that through; this is the lowest amount of overhead you can get.
- Make sure you have all of the SPICE drivers installed, as well as the SPICE agent.
- Debloat your Windows install with a powershell script. There are a lot of these scripts available on github; take your pick. There are a considerable number of background services running on Windows 10 by default. This likely won't improve performance by much, and if you need your W10 guest to be stable and reliable, don't do this. Disabling nuisance features, even if they don't seem important, are likely entrenched so deep within the core system that they'll destabalize other parts of the operating system. Nowhere is this more obvious than with Cortana, which is directly integrated into the start menu, and causes strange issues when removed.
- You can try passing through an entire drive.
Good Virsh Commands to Know
Particularly for use in scripts, it's good to know how to interface with libvirt through virsh. However, the man page is long, and lists commands in alphabetical order, so it's not a great place to learn how to use virsh. Instead, try virsh help, which organises all the virsh commands into sections.
Interactive Shell
Just typing virsh will take you to an interactive shell where you can execute commands inside of virsh without having to preface them with virsh. You can also navigate a directory tree with cd and pwd
Startup and Shutdown
-
virsh start DOMAIN
Start a domain using its name or UUID as an argument. -
virsh shutdown DOMAIN
Ask a guest to perform a graceful shutdown. The politest way possible to kick your guest out. May not work if the guest doesn't want to follow orders or can't find a way to carry them out gracefully. -
virsh destroy DOMAIN
The equivalent of pulling the power cord out of your computer. The guest will be shutdown with no warning. Try not to do this if you value the integrity of your guest.
Comments